

Category: Call of Duty: Black Ops 7

How Weapon Loadout Codes Work in Call of Duty:Black Ops 7

Call of Duty:Black Ops 7 places a strong emphasis on reducing downtime and keeping matches moving. Among its most convenient additions is the weapon loadout code system, which allows players to save, copy, and share Gunsmith builds instantly.

Instead of recreating weapons attachment by attachment, players can now apply an exact build using a simple code. Whether the setup comes from a teammate, a popular creator, or the opponent who just ran the lobby, loadout codes make copying builds fast and effortless.

What Are Weapon Build Codes?

Weapon build codes are compact, 14-character strings that store a single weapon complete Gunsmith configuration. Every equipped attachment is included, allowing another player to recreate the same weapon setup without any guesswork.

These codes are limited to weapons only. Full loadouts—such as perks, tacticals, lethals, and field upgrades—cannot be shared. This limitation is intentional. Weapon attachments tend to have optimized setups for recoil, damage, or movement, while perks and equipment choices vary widely based on mode and personal preference.

When Loadout Codes Become Available

Players unlock weapon build codes very early in Black Ops 7. Once you reach level 4 and gain access to custom loadouts, the feature becomes available immediately.

This early unlock makes the system especially valuable for newer players, allowing them to bypass extensive testing and jump straight into effective weapon configurations used by more experienced players.

How to Share a Weapon Build Code

Once a weapon is fully configured in the Gunsmith, Black Ops 7 automatically generates a build code tied to that setup.

To copy and share a weapon build code:

1.Open the Loadout menu and enter the Gunsmith

2.Select the weapon you want to share

3.Apply your desired attachments

4.Locate the generated build code on-screen

5.Choose Copy Build Code

Share the code through chat, messages, or social platforms

Copied codes can be sent to anyone and do not require the recipient to be online at the time.

How to Send Weapon Builds to Friends In-Game

For players who frequently squad up, Black Ops 7 also supports direct sharing through your friends list.

To send a weapon build directly:

1.Open the Options menu from the loadout screen

2.Select Share Weapon Build

3.Pick one or more friends

4.Confirm the selection

The chosen players will receive a notification the next time they log in, where they can preview and save the weapon build immediately.

How to Import Weapon Build Codes

Using a shared build is just as simple as sending one, provided the required attachments are unlocked.

To import a weapon build code:

1.Open the Options menu in the loadout screen

2.Select Import Weapon Build

3.Paste the 14-character code

4.Review the listed attachments

5.Save the weapon build

If any attachments are locked, the game will prompt you to remove them before entering multiplayer. This ensures fairness while still allowing partial use of the build.

Imported builds are saved but not automatically equipped. You can access them later from your saved builds or blueprints when selecting a weapon.

How to Copy Weapon Builds Mid-Match

One of Black Ops 7 standout features is the ability to copy weapon builds directly during gameplay. If another player is performing exceptionally well with a specific setup, you can save their build instantly.Get ahead before it counts. MMOexp Black Ops 7 Bot Lobbies help you build consistency, confidence, and skill—so you’re ready when the real matches begin.

While watching a killcam or Play of the Game, hold the on-screen prompt near the weapon display (default key:3 on keyboard). The game automatically saves the build and sends a confirmation notification to your main menu.

This feature is particularly useful in bot lobbies, where players can freely test copied builds without the pressure of live competition.

Why Weapon Build Codes Are So Useful

Weapon build codes remove friction from learning and experimentation. Instead of pausing videos or manually matching attachments, players can apply proven setups in seconds. This benefits competitive players, casual users, and anyone looking to improve weapon performance quickly.

Players focused on camo challenges, leveling weapons, or refining recoil control often pair build codes with controlled testing environments. Together, they allow for faster iteration, better understanding, and more efficient progression.Whether you’re learning the basics or polishing advanced strategies, MMOexp CoD BO7 Bot Lobbies for sale provide a safe, relaxed space to play, experiment, and improve without pressure.

Loadout codes in Call of Duty:Black Ops 7 may seem like a small feature, but they significantly improve how players share information and optimize weapons. From copying enemy builds mid-match to instantly sending setups to friends, the system eliminates unnecessary steps and keeps the focus where it belongs—on playing the game.
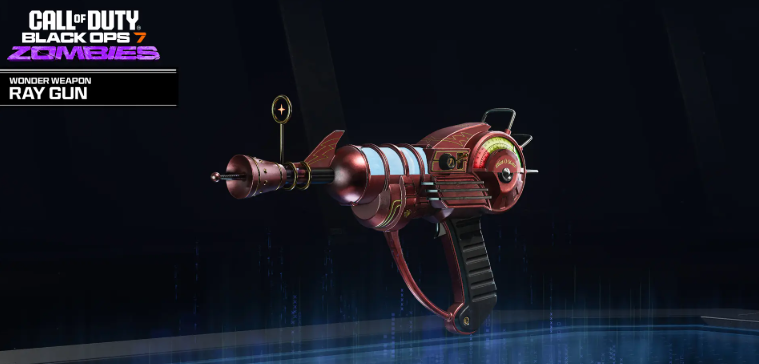
Ray Gun Mk2 Easter Egg in Ashes of the Damned – Black Ops 7 Zombies Guide

Ashes of the Damned is one of the largest and most intricate Zombies maps Treyarch has ever released in Call of Duty: Black Ops 7. With its massive layout, layered objectives, and interconnected Jump Pad network, the map can feel overwhelming at first. Fortunately, one of the most iconic weapons in Call of Duty Zombies history-the Ray Gun Mark 2-can be earned completely free through a hidden Easter Egg.

This guide breaks down every step of the Free Ray Gun Mk2 Easter Egg in Ashes of the Damned, including how the Jump Pad puzzle works, how to read the blinking light sequence, and how to guarantee the Ray Gun Mk2 drop every match.

Overview: Free Ray Gun Mk2 Easter Egg Explained

The Easter Egg revolves around Ashes of the Damned’s extensive Jump Pad system and a randomized flashing light sequence located in Janus Towers Plaza. While the puzzle may seem confusing at first, it becomes extremely consistent once you understand the logic.

Players practicing high-round strategies or challenge routes-especially those running controlled matches like Call of Duty Black Ops 7 Bot Lobbies-can complete this Easter Egg quickly and reliably every game.

Step 1 – Turn On the Power and Fully Open the Map

Before starting the Easter Egg, you must meet the following requirements:

·Turn on the main power

·Unlock all major areas connected by Jump Pads

·Have at least 4,000 Essence available

Once the map is fully opened and powered, you’re ready to begin the Jump Pad sequence.

Step 2 – Use Every Jump Pad in One Complete Loop

Your first task is to use all eight Jump Pads on the map in a single continuous loop.

Important details:

·You may start at any Jump Pad

·The order does not matter for this step

·You must end at the Jump Pad where you started

Each Jump Pad costs 500 Essence, totaling 4,000 Essence.

Example Jump Pad Loop:

·Blackwater Lake

·Ashwood

·Exit 115

·Zarya Cosmodrome

·Ashwood

·Vandorn Farm

·Janus Towers Plaza

·Back to Blackwater Lake

As long as all eight pads are used in one cycle, the step will complete successfully.

Step 3 – Survive Four Full Rounds

After completing the initial Jump Pad loop, simply survive four full rounds. There are no additional actions required during this time.

Once four rounds have passed, the next phase of the Easter Egg will activate automatically.

Step 4 – Read the Blinking Light Sequence

Head to Janus Towers Plaza and look toward the north-facing lights in the main lobby. The furthest-left light will begin blinking in a randomized pattern.

Here’s how it works:

1. Count the number of flashes

2. Wait for the pause

3. Count the next set of flashes

4. Repeat until the light stays solid

The sequence ranges from 1 to 7 flashes per number and will loop continuously if you miss it.

Step 5 – Translate Numbers to Jump Pads

Each number corresponds to a specific Jump Pad location:

·1 – Janus Towers Plaza

·2 – Vandorn Farm

·3 – Ashwood (Market Square → Exit 115 / Zarya)

·4 – Blackwater Lake

·5 – Exit 115

·6 – Zarya Cosmodrome

·7 – Ashwood (Rabbit Alley → Vandorn Farm / Blackwater Lake)

Using the example sequence (3, 6, 5, 7, 4, 1, 2), your Jump Pad order would be:

·Ashwood (Market Square)

·Zarya Cosmodrome

·Exit 115

·Ashwood (Rabbit Alley)

·Blackwater Lake

·Janus Towers Plaza

·Vandorn Farm

You must use the Jump Pads in the exact order shown. Using a Jump Pad out of sequence will fail the Easter Egg, requiring a restart in the next match.

Step 6 – Enter the Purple Portal

After completing your numbered Jump Pad sequence, return to Ashwood using the Jump Pad you’re currently on to finalize the loop.

Now look up into the sky. You will see a purple portal floating between two Jump Pad routes. Its location is random for each match.

Examples include:

·Vandorn Farm → Janus Towers

·Janus Towers → Ashwood

·Ashwood → Blackwater Lake

Use the correct Jump Pad that launches you directly into the portal.

Step 7 – Claim the Free Ray Gun Mark 2

If done correctly, you’ll be teleported back to Ashwood, where a rift opens and releases:

·Dead zombies

·Essence piles

·Bonus Points

·Possible Mystery Perks

·A free Ray Gun Mark 2

While the Ray Gun Mk2 can drop before Round 15, success rates are far more consistent after Round 15. Players optimizing runs-especially in Call of Duty Black Ops 7 Bot Lobbies for training or XP farming-should wait until after Round 15 for guaranteed consistency.

Final Tips and Warnings

·Never use a Jump Pad out of order.

·The initial 8-Pad loop only needs to be done once per match.

·The blinking sequence is randomized every game.

·The Easter Egg is repeatable every match.

·Works in co-op, but all players must follow the sequence correctly.

Final Thoughts

Unlocking the free Ray Gun Mk2 in Ashes of the Black Ops 7 Zombies. Once mastered, it takes only a few minutes and provides one of the strongest Wonder Weapons in Zombies history-perfect for mid-game stability and ultra-high-round survival.

Powered by WordPress & Theme by Anders Norén