

Act 3 begins at the Kurast Docks, which is your new home now. As soon as you enter, speak to Hratli, who is the town’s blacksmith. Once you leave town to progress, he’ll move back to his original spot, which is in the middle of the village. In act 3, you’ll get a better idea of what build you’re going to target. Besides that, it’s recommended that you ignore the magic equipment drops and focus on charms as they’re known to be useful. Yes, your gear will get you resistance, but at lower levels, it’s better to have assistance, for d2r act 3 quests.
The Golden Bird (Quest #1)
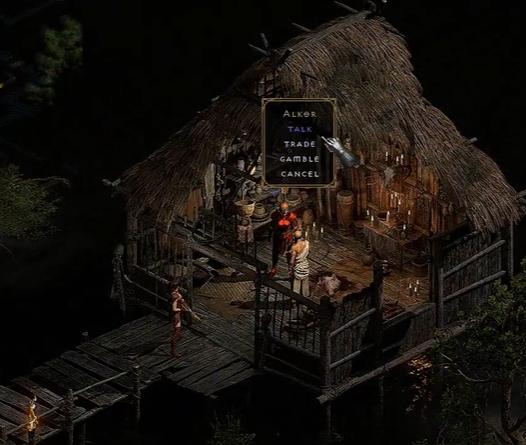
As you leave the town, you’ll encounter Diablo in the form of a Lonely Wanderer. You won’t be able to attack him, and he’ll vanish soon; however, he’ll leave behind a horde of beasts that need to be quickly killed for d2r act 3 quests. As you continue ahead, you’ll encounter a Unique or Champion monster that needs to be taken down to obtain the Jade Figurine. Take the Diablo 2 Resurrected Item back to town and hand it over to the NPC named Meschif to receive a Golden Bird, which then needs to be taken to Alkor, who’ll give you the Potion of Life. This potion grants +20 HP.
Blade of the Old Religion (Quest #2) + Khalim’s Will (Quest #3)

Generally, the majority of players locate the Spider Cavern first, which is located somewhere within the Spider Forest. You need to pay attention as there is also another dungeon there known as the Arachnid Lair, which is optional. Within the Cavern, you’ll face off against several Flame Spiders and a mini-boss. Quickly take them down and open the golden chest to obtain Khalim’s Eye, for diablo 2 act 3 quests.
Next, head to the Flayer Dungeon, located within the Flayer Forest. Once you locate the entrance, you have to click on the large alter to trigger a spawn of monsters. Deal with them to obtain the Gidbinn in the form of a drop for diablo 2 act 3 quests. You need to take the item back to the town and hand it to Ormus. After that, speak to Asheara, and Ormus will hand you a rare ring as a reward for completing the Blade of the Old Religion.
Head back down into the Flayer Dungeon and fight the monsters along your path. In the end, you’ll encounter a mini-boss in the versions of a Shaman. Take it down, open the golden chest, and pick Khalim’s Brain from it, for the diablo 2 quest guide. Continue ahead until you find the City of Kurast. You’ll encounter Zakarum Priests, Thorned Hulks, Faithful, Zealots, and Baboon Demons here.
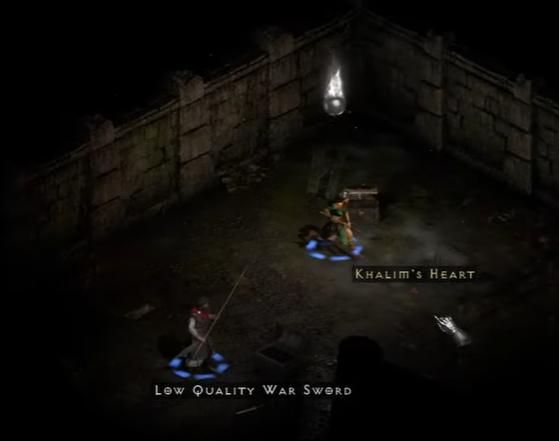
You need to look for the Sewers within the town and walk around the edge of the map to locate a golden chest that has Khalim’s Heart in it. Now, you need to locate Travincal by walking through the areas of Kurast. At the end of Travincal, you’ll encounter several Council Members that need to be taken down to obtain the final items called Khalim’s Flail. Place the three items within the Horadric Cube and transmute them for the diablo 2 quest guide. After that, use the powered Flail to smash the Compelling Orb at the council area to gain access to the Durance of Hate.
Lam Esen’s Tomb (Quest #4) + The Blackened Temple (Quest #5)
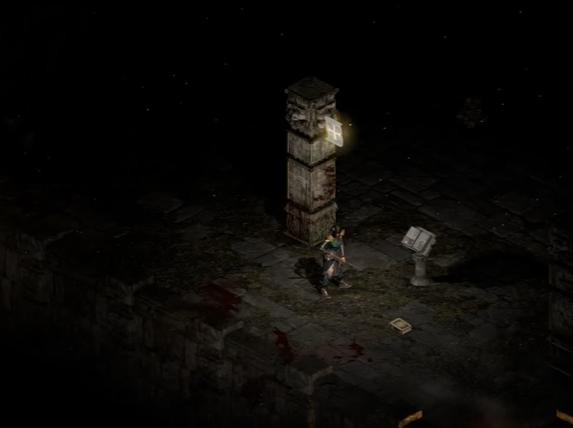
Before you begin the quest, you need to first enter Kurast, and only then speak Alkor. He’ll task you to search six tombs in the Bazaar, Causeway, and Upper Kurast. The only one you need to go into is the Ruined Temple in Bazaar. Within it, you’ll encounter Battlemaid Sarina, and it’s recommended that you clear out the mods before approaching her.
The Guardian (Quest #6)
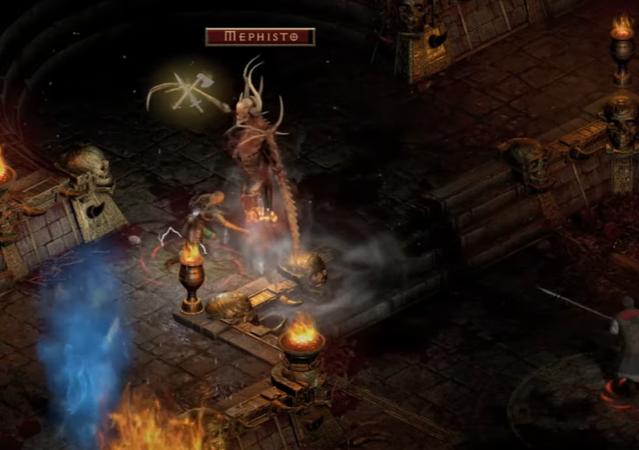
Now it’s time to fact the act 3’s boss called Mephisto. You need to enter the Durance of Hate and stick to the left-hand wall to reach level 3. Make sure that you grab the waypoints on each level to save time in the future. You’ll encounter powerful variants of Vampires, alongside Maulers, Blunderbores, Cadavers, and Stygian Dolls.
When you hit level three, you’ll come across a few more powerful monsters, alongside Council Members and Mephisto himself. Defeat the minions before approaching the boss, and players usually approach Mephisto from the right while fighting Maffer Dragonhand as he doesn’t teleport around.
The best advice is to let the boss target your summons or hirelings so that you can get up close and deal damage. Another way is to lure him toward the moat of blood in the area, and then run around him so that he’s stuck there. You can easily use ranged to take him down after that. It’s a good strategy for classes like Sorceress, who can use Teleportation spells to lock him. Once he’s dead, pick the Soulstone, and then head through the red portal to reach the area for act 4.